Integrating Moneris with Breadstack ensures that your customers' credit card payments will route correctly. For extra security, many online stores opt for Moneris 3-D Secure (3DS).
This option provides enhanced cardholder authentication between merchants and issuers, resulting in an extra layer of real-time fraud protection before the payment is authorized.
Follow these steps to set up an integration between Moneris 3-D Secure and your Breadstack store.
Step 1: In your WooCommerce store admin environment
- Go to Plugins and install the latest version of the Breadstack 3DS Moneris plugin for your store.
- Navigate to WooCommerce Settings > Payment. You should now see Moneris listed as a payment option. Click Manage to open it.
- You'll see a number of options here. To ensure Moneris is functional on your website, you must:
- Click the Enable checkbox.
- Input the BS API Key (this will be provided by Breadstack Customer Support).
-
- (Optional) Customize the Title and Description that customers see at checkout.
- (Optional) Customize the Title and Description that customers see at checkout.
When Moneris is properly enabled as a payment option, you should no longer see the "Enable" button next to it in Settings > Payment.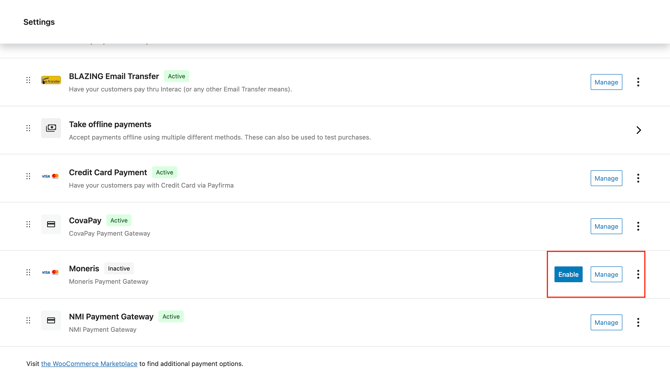
Step 2: In your Moneris account
The following steps are performed in Moneris. Please note that screens and labels may be subject to change.
- Go to your Dashboard. Under Admin, select Moneris Checkout Config.
- If you already have a profile, you should see your Checkout ID here. Otherwise, create a new profile to automatically generate one. Save your Checkout ID and note it down (you'll need it later).
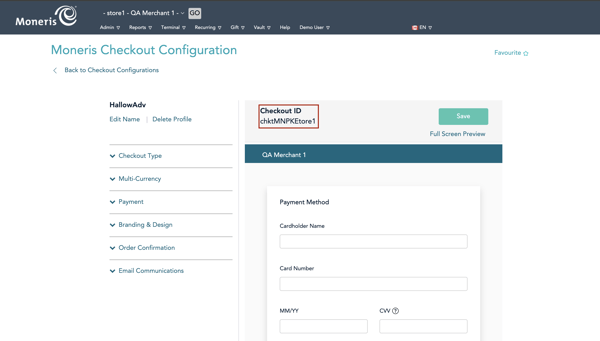
- In the left-hand menu, open the Checkout Type dropdown. Select I have my customer order form and want to use Moneris simply for payment processing. This will ensure that when Moneris appears as a payment option on your site, it is properly embedded in your site's design.

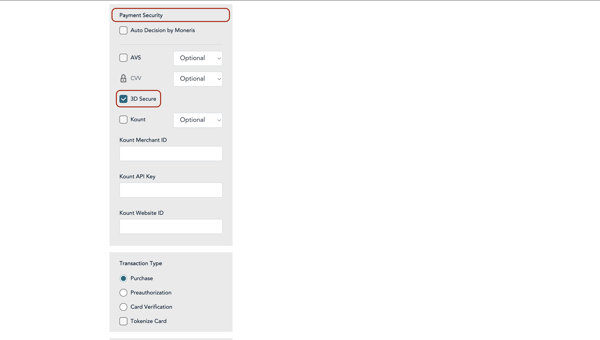
- In the left-hand menu, open the Payment dropdown. Under Payment Security, check the box next to 3D Secure.
-
Retrieve your Moneris Store ID and API Token. Follow Moneris' instructions to find each:
- Get your Moneris Store ID.
- Get your Moneris API Token (see "Obtaining..." near the bottom of the page).
Before moving on to the next step, make sure you have noted down three Moneris credentials: your Checkout ID, Store ID, and API Token.
Step 3: In your Breadstack account
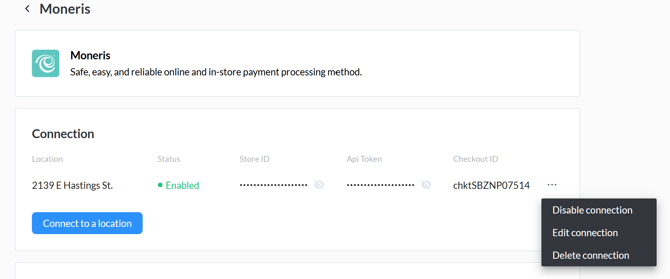
- Go to Settings > Integrations. Find and select Moneris to open the integration page.
- Under Connections, click Connect to a location. This will open a popup where you must select the store location you wish to connect, then provide your Moneris Store ID, API Token, and Checkout ID.
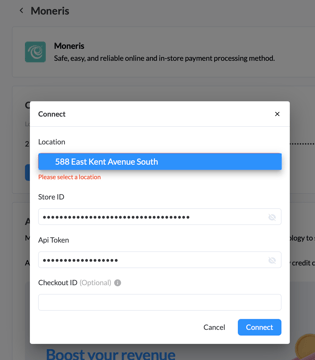
- Click Connect. If the integration was successful, Moneris will show as "Enabled" for your store.
If you see an error message, first double check that your credentials are free of typos, and that the Breadstack 3DS Moneris plugin is enabled in WooCommerce.
Update or turn off your Moneris integration
You can edit your integration in Settings > Integrations > Moneris. Click the three dots next to the store connection you wish to edit.
This will open a menu where you can:
- Edit connection - Update your Moneris Store ID, API Token, or Checkout ID credentials if they change;
- Disable connection - Turn off Moneris as a payment method without losing the credentials you saved;
- Delete connection - Remove the integration permanently, along with any stored credentials.