If you offer local delivery (Onfleet or Breadstack Delivery) you can define delivery zones near or around your store location. Customers whose shipping addresses fall within those zones will be able to select local delivery when placing an order from that location.
You can manually define new zones, upload them as postal codes from an Excel file, or copy them from another location.
To start setting up your zones:
- Go to Settings > Locations and click on the location for which you would like to create a delivery zone.
- Under Fulfillment, click the gear icon next to Delivery.
- In the top menu, select Delivery zones.
- Under the How would you like to define the zones? dropdown, choose either Drawn zones, Distance radius, or Postal/ZIP codes.
Which method should you choose?
Drawn zones
Use a pen tool to literally draw each zone on a map of your area. This method takes some time to set up, but it offers flexibility and customization.
Use this method if your delivery zones are irregular, if you want precise control over which neighbourhoods are included, or if you want to factor in roadblocks or busy streets.
Delivery radius
Set one or more radii from your store location (e.g., 5 km, 10 km, 15 km). Customers are automatically assigned to the zone with the lowest fee where radii overlap. This method is simple to set up and easy to scale.
Delivery radii work well if you're located centrally in your service area and your pricing is distance-based,
Postal codes
Using ZIP/postal codes as your delivery zones gives you fine-grained customization over fees per area. You can also import a list of postal codes from a previous delivery management system.
For next steps, see:
- Creating a new drawn zone
- Creating a new distance radius zone
- Creating a new ZIP/postal code zone (or importing a list of postal codes)
- Copying and pasting a zone from another store location
Creating a new drawn zone
- With Drawn zones selected in the dropdown, click Add zone under the map image.
- Give your zone a name you and your colleagues can easily recognize.
- In the popup, you'll see a map with a toolbar. Select the hand icon to move the map.
- Select the drawing icon and click points on the map to define your zone. Make sure you connect the last point to the first; your zone will appear dark grey when properly closed.
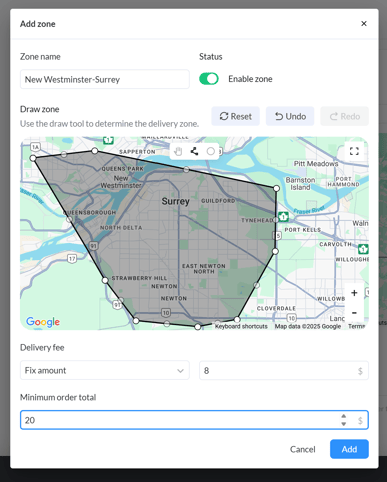
Alternatively, select the circle icon to quickly define a circular zone. Drag a circle on the map, then resize it by clicking and dragging from a point, or move it by clicking and dragging from the centre. - Set a Delivery fee (either a fixed amount or percentage of order total) for your zone, If desired, set a Minimum order total for customers in that zone to qualify for local delivery.
- Ensure the Enable zone toggle is on if you would like this zone to immediately become active.
- Click Add. Your zone will appear in the list of drawn zones.
- Click Save at the bottom of the screen.
Creating a distance radius zone
You can create delivery zones based on distance radius from your store location.
- With Distance radius selected in the dropdown, click Add zone.
- Define your zone's distance radius from your location.
- Set a Delivery fee (either a fixed amount or percentage of order total) for your zone, If desired, set a Minimum order total for customers in that zone to qualify for local delivery.
- Ensure the Enable zone toggle is on if you would like this zone to immediately become active.
- Click Add. Your zone will appear in the list of distance radius zones.
- Click Save at the bottom of the screen.
Creating a new postal/zip code zone
You can create postal/ZIP code zones within Breadstack, or upload them from a file.
Prefer to upload an Excel list of postal/zip codes?
Note that this will overwrite any ZIP/postal code zones currently saved for your location.
Please prepare your Excel file to match this sample file and ensure you have saved it in CSV format.
With ZIP/Postal code selected in the dropdown, click Import zones and upload your file.
To create a new postal or ZIP code zone in Breadstack:
- With ZIP/Postal code selected in the dropdown, click Add zone.
- Type the ZIP or postal code. Add a full postal code individually, or add a Forward Sortation Area (first segment) to automatically add all the associated postal codes. For example, adding “V3H” would automatically add V3H 0H5, V3H 0H6, etc.
- Set a Delivery fee (either a fixed amount or percentage of order total) for your zone, If desired, set a Minimum order total for customers in that zone to qualify for local delivery.
- Ensure the Enable zone toggle is on if you would like this zone to immediately become active.
- Click Add. Your zone will appear in the list of ZIP/postal code zones.
- Click Save at the bottom of the screen.
Copying and pasting zones from another store location
You can copy drawn zones or postal/ZIP code zones from any of your additional store locations in Breadstack.
Warning
Please note that copying and pasting zones from another store location will overwrite the zones already saved for your current location.
- With either Drawn zones or ZIP/Postal code zones selected in the dropdown, click Paste zones.
- In the popup, select the store from which you would like to copy zones. You'll see that store's zones displayed.
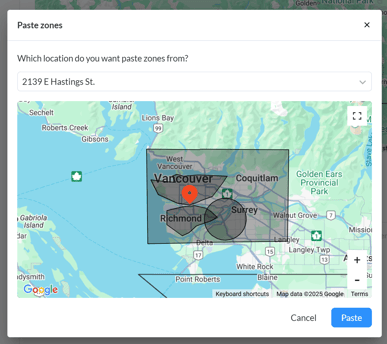
- Click Paste. You'll see the pasted zones displayed on the map and/or in the list. By default, pasted zones will feature the same delivery fees and minimum order totals as at the original location; however, you can edit these details for each individual zone.
- Click Save at the bottom of the screen.